

How To Install A Window New Construction
1 / 26

Back in the day, most window installations went something like this: Set, level, square, smash, spray foam, rinse, echo. But at that place are a few more steps these days, and not all of them have to do with preventing h2o from getting inside. In fact, many modern window installation steps are designed to allow water out, if it ever does observe a manner in.
To make certain we got it right, we asked our local Tyvek rep Lori Gunderson and Marvin Window installation guru Eric Klein to walk united states through the process. In add-on to proper procedures, Eric shared a bunch of installation pro tips, hints, and tricks.
In this story we demonstrate how to install a Marvin double hung window. Many of these steps are common among window manufacturers, but not all of them. When installing a window, always follow the specific pedagogy intended for the brand you are working with.
ii / 26

Cutting Out the Opening
- Roll the house wrap, or WRB (Conditions Resistant Barrier), over the entire window opening.
- And so slice down the centre of the WRB and cutting it flush at the top and lesser of the opening.
3 / 26

Angle-Cut the Corners
- Cut at an angle almost six-in. upwards and away from all iv corners.
- Note: The bottom angle cuts are not required by all window manufacturers.
4 / 26

Fold Back the Flaps
- Fold back the side-flaps and hold them in place temporarily with seam seal or house wrap tape, not staples.
- Pro Tip: Use a small-scale piece of tape so it doesn't tear the WRB when it's removed.
- Patch any tears that exercise occur with seam seal record. If there are no fasteners in the way, fold the WRB back under itself.
v / 26

Gradient the Sill With Siding
Even with a perfect install, water can however find its way into the opening. It's a good idea to slope the sill in the crude opening to help unwanted water find its way out again. Attain the slope by ripping down and installing a beveled piece of conditions resistant siding.
- Plan ahead and build the rough openings about 1/2-in. taller to business relationship for the width of the siding.
- Shim under the siding if the opening is super out of level, but avoid raising the window higher than other windows nearby. The deviation in height will exist noticeable and cruddy.
six / 26

Install the Sill Pan Flashing
We're installing Dupont FlexWrap on this window. In that location are other acceptable products on the market, only FlexWrap has a great track tape and is recommended by the folks at Marvin.
- Tear the 6-in. bankroll off the flashing tape and lay the tape down over the sill affluent with the interior framing.
- Run the tape a minimum of six inches upward the sides of the opening.
- Pro Tip: Eric pushes the tape tight into the corners with a speed or rafter square.
seven / 26

Roll Out the Flashing
- Remove the smaller strip of backing and push the record downwards onto the wall. This flashing is pressure level sensitive and needs to be pressed in place with a roller.
-
- Pro Tip: On super cold days the stretched corners of the FlexWrap tin ringlet back just a scrap. Concord them down in place with a strip of seam seal tape.
-
viii / 26

Install Shims on the Sill
-
- Set the lower shims (preferably composite) in place before setting the window.
- Pro Tip: Eric dabs a little sealant under the shims. That helps go along them in place when setting the window but keeps them loose enough, then they tin be moved for minor adjustments afterwards.
- Space the shims near the edges, in the center, and for larger windows one no more than than 14-in. apart.
- Set the lower shims (preferably composite) in place before setting the window.
9 / 26

Fold in Sides
- Wrap the two side WRB flaps inside, effectually, and on to the inside framing.
- Staple or record it in place.
ten / 26

Seal the Sides and Tiptop Before Setting the Window
-
- Run a three/viii-in. bead of sealant about one-half inch in from the edge of the opening.
- Leave a 3/4-in. gap on each side of all 4 corners. Leaving the corners complimentary of caulk ensures the corner gaskets have a clean, smooth surface to adhere to.
- Don't caulk under the bottom nailing flange. Most exterior form "Window, Door, and Siding" sealant will work.
11 / 26

Align the Within of the Window
There is no reason to plumb the window because if the wall is out of plumb, and so goes the window. But do the trim carpenters a favor and double bank check that the window jambs are as even with the framing as possible. If one side of the window protrudes in further than another, installing casing tin can exist a hard suggestion. Only brand pocket-size adjustments. Over-twisting the window could cause the sashes to jam or stick instead of operating smoothly.
12 / 26
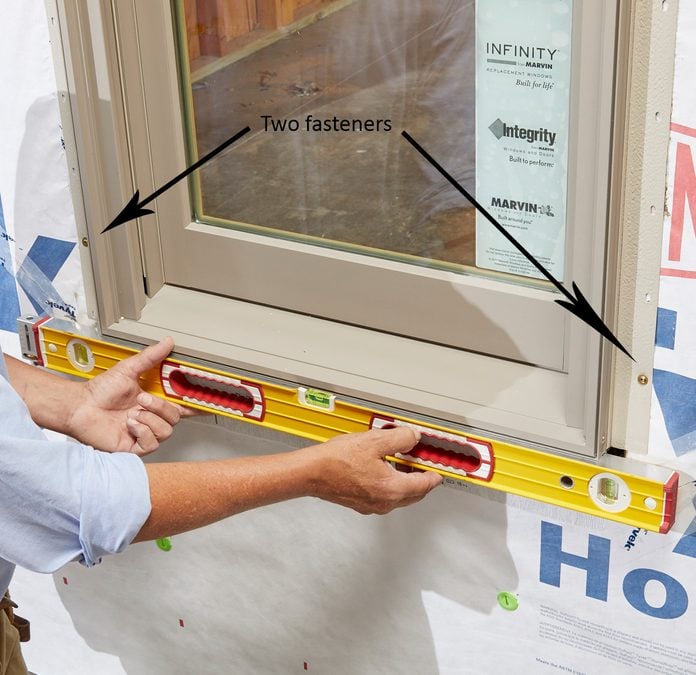
Level and Fasten the Bottom
- Have a helper on the inside center the window in the opening.
- Accommodate the shims and so that the lesser of the window is level so that each one is in contact with the window.
- Install two 2-in. exterior grade fasteners on each side well-nigh the lesser of the window, and then cheque the bottom again with a level.
- Pro Tip: Eric prefers screws to nails considering information technology's easier to readjust the window if something gets out of whack. GRK cabinet screws are his favorite.
13 / 26

Square and Spike the Top
- Check that the window is square by measuring diagonally both ways.
- Suit the top of the window i way or the other until the measurements are the same.
- Pro Tip: To ensure an authentic measurement, e'er hooks the tape under the vinyl drip cap. The baste cap also helps hold his record measure out in place.
- Install 2 fasteners at the meridian nearly the corner, then check for square again.
- Don't install whatever more fasteners until the window is shimmed and sealed on the inside.
14 / 26

Seal up the Within
This next section will walk yous through the process of sealing effectually the window. Pictured above is what it should look like when you are all done. Note: Again, this is an approved method for installing Marvin windows. Other manufacturer's methods will vary.
15 / 26

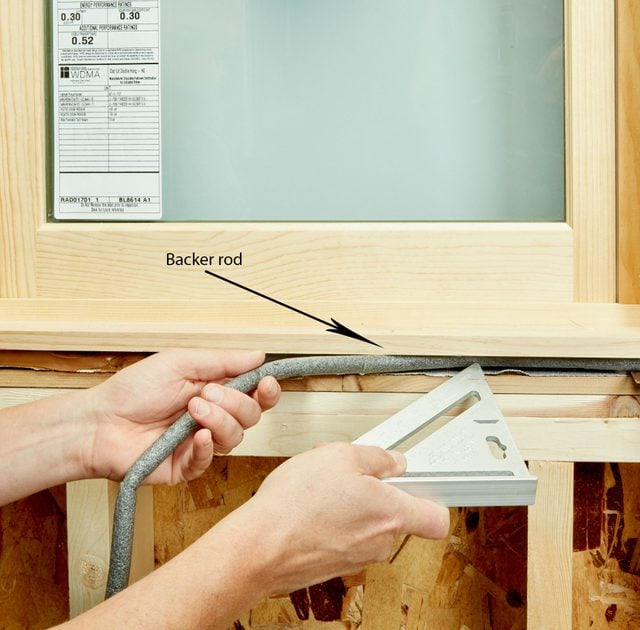
Install Capitalist Rod on the Sides and Top
-
- Before installing any more shims insert a capitalist rod on both sides and the height, just not the bottom.
- Push the backer rod tight upwards against the back of the nailing flange.
- Pro Tip: Eric uses his speed/rafter square to make several passes pushing in simply a couple inches at a time.
- The idea backside this backer rod is to eliminate thermal bridging and water infiltration. It prevents the side shims from butting upward against the nailing flange, which could aqueduct rut and water.
16 / 26

Straighten the Jambs
There are three means to check that the jambs are direct earlier installing the side shims:
- Inspect the reveals (space) between the jambs and the sashes. They should be fifty-fifty.
- The distance between the ii side jambs should be equal at the top, heart, and bottom. This can exist checked simply by measuring. PRO TIP: Instead of measuring, Eric uses the acme stop equally a story pole and compares the gaps betwixt the stop and the jamb at the top, lesser, and center. Create your ain story pole if the window you're installing does non accept a top stop, and you lot have a agglomeration of them to install.
- Open and close both sashes to ensure they operate smoothly.
17 / 26

Install the Side Shims
- Install shims on the sides of the window in the middle, and about four inches downwards from the acme and up from the bottom.
- Some windows take dedicated holes to spike the jambs to the framing (see next page). Place shims in those locations.
- Often, the middle of the side jambs will take to be pushed in a bit.
- Pro Tip : Eric nudges the jambs over with an Air Shim bag to the exact position he wants, and then installs the shims.
- Don't shim the top of the window. If the building settles, the window could get compressed, which will likely cause the window to stop working properly and could fifty-fifty result in broken panes of glass.
18 / 26

Install the Within Screws
In addition to the fasteners in the nailing flange, this window is held in place with screws run through a bracket called the receiver block. It's located in the checkrail and can be accessed by removing the lower sash. The shims should be located at these locations.
-
- Pro Tip: A long bid holder will make it easier to avoid scuffing the window with the drill chuck.
19 / 26

Foam the Sides and Top
- Run a bead of depression-expanding cream in the gap forth side the backer rod. Don't over do it. Just manipulate plenty foam to create a one or ane-1/2-in. bead that bridges the entire gap between the window and the framing.
- Run the dewdrop out a little ways along each side of the shim. Don't fill the whole space in because even depression-expanding foam can expand enough to distort the jambs.
- Pro Tip: Lay out a practice dewdrop on a piece of cardboard, so you can conform the gun, and guess how fast to movement the tip forth within the gap.
twenty / 26
Install the Lesser Backer Rod
- Starting at one of the lower shims, push in a backer rod around the bottom and up to the other shim.
- Don't push button it all the way in like yous did with the other backer rod. Just button in almost to the signal where the jamb meets the window unit of measurement.
21 / 26

Create a Back Dam
- Fill the gap from the lower backer rod nearly all the way to the inside edge of the framing.
- Tool in the sealant with your finger or a small clamper of backer rod to ensure that the whole gap gets filled. This back dam will prevent whatever h2o that gets past the other lines of defence from getting inside the house.
- If the window is installed properly there should be nothing stopping the water from escaping back to the corking outdoors.
22 / 26

Add Insulation
- Fill up in the rest of the gap on the sides (to a higher place the lower shims) and the top with fiberglass or rock wool insulation.
- Fill the whole gap, but continue it loose and fluffy. Insulation loses its effectiveness the more tightly packed information technology gets.
23 / 26

Add Corner Gaskets
- If the window y'all're installing requires corner gaskets, now's the time to install them.
24 / 26

Tape the Flanges
Some windows have a nailing flange that is an integral office of the window (usually vinyl windows), but this window does not. So in order to seal the surface area where the flange meets the window, the flashing record needs to be run up onto the side of the window at least 1/4-in.
- Install the tape on the sides showtime, about iv inches past the bottom of the window and about an inch higher than the upper nailing flange.
- Run the flashing tape at the pinnacle at least six inches by the window on each side.
25 / 26

Record the Pinnacle Flap
- Fold downwardly the meridian flap of WRB and embrace the two angled cuts with seam seal record.
- Don't tape the entire bottom of the flap. Instead, but apply a few pocket-size strips of tape to agree it in identify. The gaps betwixt the tape are there to create an escape road for whatever water that gets behind the WRB higher up the window opening.
26 / 26

DONE!
That'southward all there is too it! Okay, nosotros admit that window installation is not every bit uncomplicated and easy as used to be…simply neither are water harm and callbacks. We desire to thank our 2 experts for stopping past and walking us through the entire process:
Run into the experts
Lori Gunderson
Lori has been a Tyvek Specialist for over 12 years. She works closely with Architects, General Contractors, Builders, and installers to help build a quality, free energy efficient building. Before becoming a Tyvek Specialist, she worked for a national builder for over ten years where she managed unmarried family and multifamily projects.
Eric Klein, Senior Installation and Service Instructor
Eric has been employed by Marvin Windows and Doors since March of 1984 and has trained thousands of installers in the facilities at Warroad, MN and on his travels that have taken him across the earth. He is an Accredited Instructor and certifies installers in the Residential, Light Commercial, and Commercial window and door installation. Eric too works with several assembly and vendors on how to improve serve the installers, contractors, and service techs with better tips and tricks, and installation knowhow.
More resources:
http://www.dupont.com/products-and-services/fabrics-fibers-nonwovens/protective-fabrics/brands/tyvek.html
https://www.marvin.com/

How To Install A Window New Construction,
Source: https://www.familyhandyman.com/list/window-installation-the-right-way/
Posted by: menendezupong1962.blogspot.com
0 Response to "How To Install A Window New Construction"
Post a Comment