

How To Install Windows 7 On Dell Poweredge T20
PCIe NVMe storage can provide an incredible speed boost to any server but booting from it is non natively supported on some older Dell PowerEdge servers.
11th and twelfth generation servers like the Dell PowerEdge R710 and R720 are very popular amidst the home lab community and could benefit from a fast kicking device.
This procedure should work on any Dell PowerEdge Server that tin can kicking from a USB device.
Booting from NVMe storage is simple to exercise. In this post I am going to explain how it's done and bear witness the benchmarks from both a Dell PowerEdge R310 and T320.
Hardware you will need:
- Two USB Flash drives:
- One to run clover bootloader. I used this tiny Sandisk Ultra Fit Flash Drive.
- One for your bootable Windows ISO.
- A PCI NVMe Adapter and a NVMe Drive:
- I used this cheap NVMe to PCIe adapter from Amazon.
- With a Samsung 970 Evo Plus also from Amazon
I also tested the process on an 1.2Tb Intel DC P3520 PCIe bill of fare, which also worked fine.
Software yous will need:
- A Windows Server Installation ISO
- Rufus to create the bootable Windows Installation.
- Boot Disk Utility
PCIe NVMe Boot Procedure
When this procedure is complete, the PowerEdge server will kick from the internal USB storage and run the Clover EFI Bootloader. Clover will contain the NVMe boot driver and boot the installed operating arrangement from the NVMe storage.
If your server has internal SD card storage, you could boot from that instead.
Install the NVMe Adapter and Bulldoze
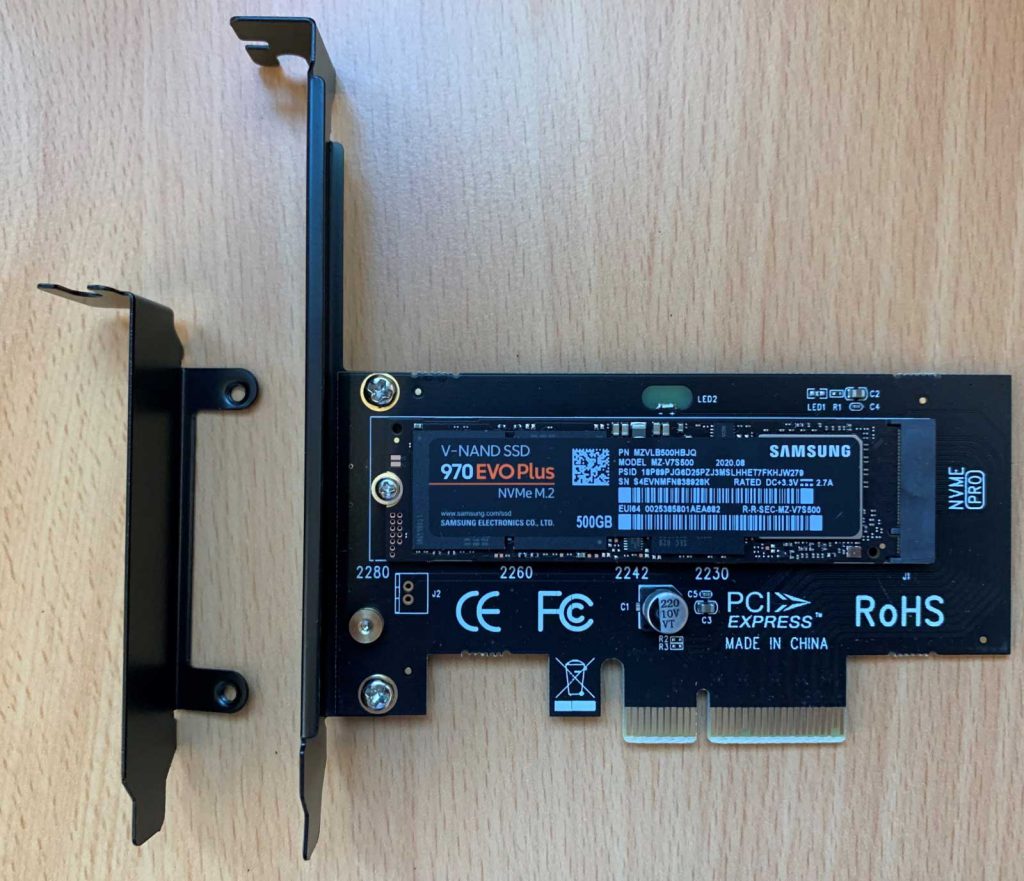
First install the NVMe adapter and drive into your Dell PowerEdge server. I used this cheap adapter from Amazon and a 500Gb Samsung 970 Evo Plus.
Here is the unit of measurement earlier I installed it into the server without the heatsink practical. It comes with regular and depression profile PCIe bracket:
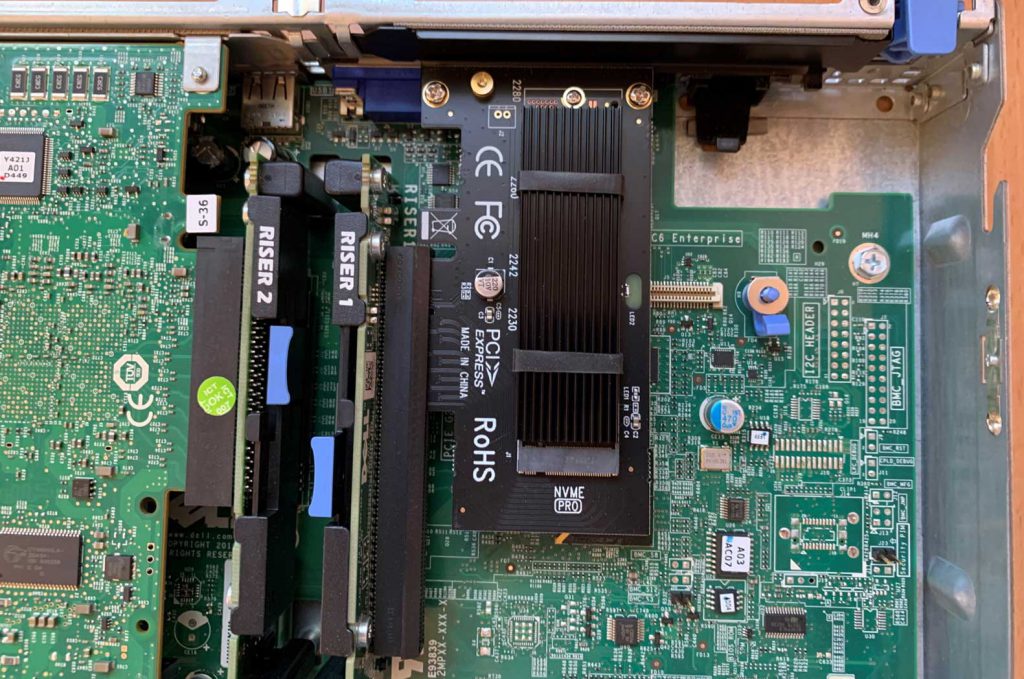
And hither is the unit installed in the PowerEdge R310 with the heatsink and thermal pad applied:
Create your bootable Windows Server Installation
The first step is to create your Windows Server Installation USB Stick. At that place are lots of guides on how to exercise this merely I volition show how I did it.
- Download and Install Rufus.
- Point Rufus to your Windows Server ISO.
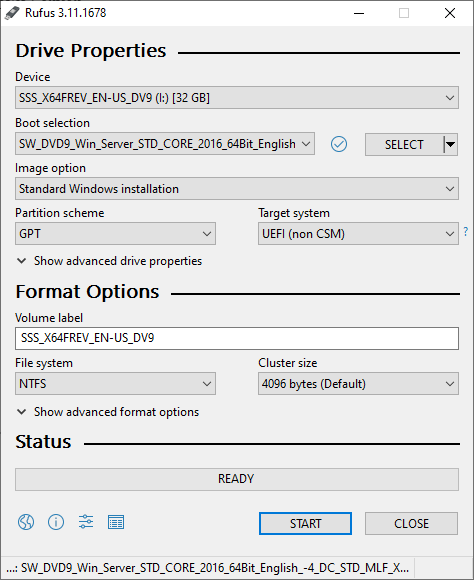
- Configure Rufus with the following options:
- Division Scheme: GPT
- Target System: UEFI (non CSM)
Install Windows in the normal mode
Windows Server 2012 R2 and newer have Microsoft NVMe drivers built in, then it will see the NVMe storage and offer to install to that location.
When Windows setup is complete it will reboot. Information technology volition be unable to do because the Dell UEFI does non take whatsoever NVMe back up. Just don't worry about that!
Setup the Clover EFI USB Boot Stick
Now setup the Clover USB Boot stick or SD Card.
- Download and run Boot Disk Utility.
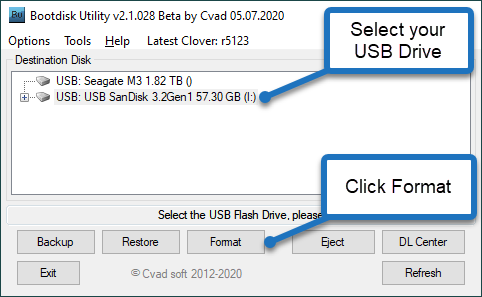
- Insert the USB Stick that you are going to kicking from into your PC.
- Select your USB Stick and click format:
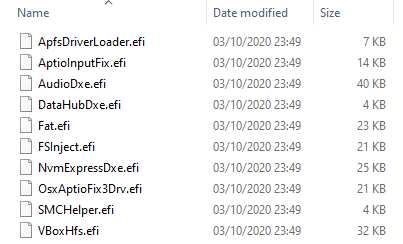
- Open your newly formatted drive and copy \EFI\CLOVER\drivers\off\NvmExpressDxe.efi to:
- \EFI\CLOVER\drivers\BIOS
- \EFI\CLOVER\drivers\UEFI
Copying the NvmExpressDxe.efi to the drivers folder adds NVMe back up to Clover which volition enable booting from the Windows Installation that has only been completed.
My \EFI\CLOVER\drivers\UEFI looks similar this:
Insert the Clover USB Flash Drive or SD Card into your server
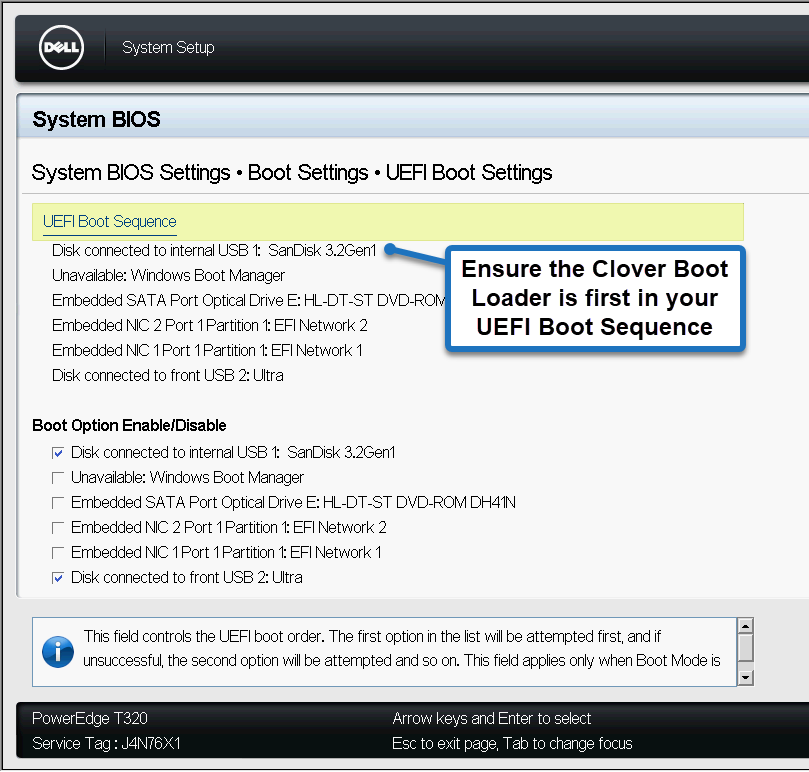
Next simply insert the USB flash drive or SD Carte into your server and set the UEFI boot order on the server to boot from it:

Ensure your UEFI Boot gild is set up correctly and pointing to your Clover USB Stick or SD Carte du jour:
When booting from the internal Clover USB stick information technology will briefly display a boot screen:
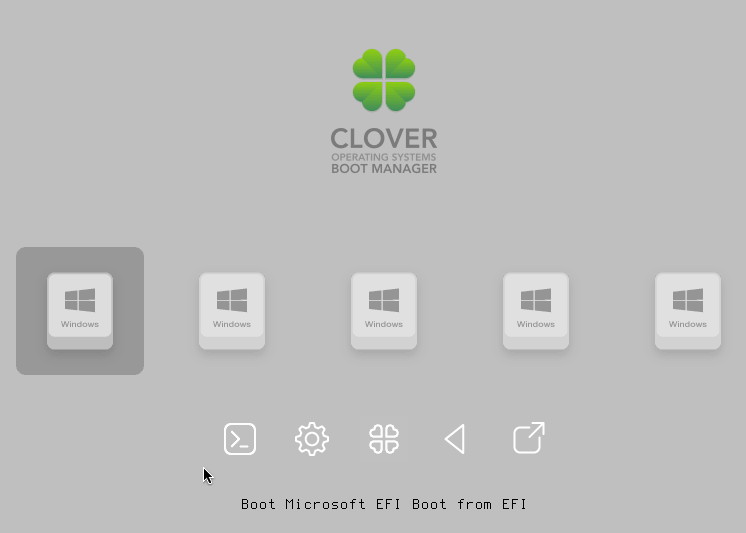
The clover defaults worked correct away for me and I didn't have to configure annihilation.
Y'all can modify the config.plist file (which is in the root of the USB Stick) to reduce the timeout if you want to speed things up a little flake:
<fundamental>Kicking</key> <dict> <central>#Arguments</key> <string>slide=0 darkwake=0</cord> <key>#DefaultLoader</key> <string>boot.efi</string> <cardinal>#LegacyBiosDefaultEntry</cardinal> <integer>0</integer> <key>#XMPDetection</key> <cord>-i</cord> <cardinal>CustomLogo</fundamental> <false/> <primal>Debug</key> <false/> <key>DefaultVolume</key> <cord>LastBootedVolume</string> <primal>DisableCloverHotkeys</key> <false/> <key>Fast</cardinal> <false/> <primal>Legacy</key> <string>PBR</cord> <key>NeverDoRecovery</cardinal> <true/> <key>NeverHibernate</primal> <simulated/> <central>RtcHibernateAware</fundamental> <false/> <key>SignatureFixup</fundamental> <false/> <key>SkipHibernateTimeout</key> <false/> <key>StrictHibernate</key> <false/> <key>Timeout</key> <integer>v</integer> </dict>
Modify the "integer" value on line 36 to reduce the kicking delay.
Windows should now proceed to boot normally straight from the NVMe drive.
Performance Results
I was really impressed with how much faster both machines PowerEdge are when booting from the NVMe drive. For the purposes of clarity the config of these systems are:
Dell PowerEdge R310
Intel XEON X3470 2.93GHz
16Gb Ram
Dell PERC H700 (512mb)
Dell PowerEdge T320
Intel XEON
32Gb Ram
Dell PERC H710 (1Gb)
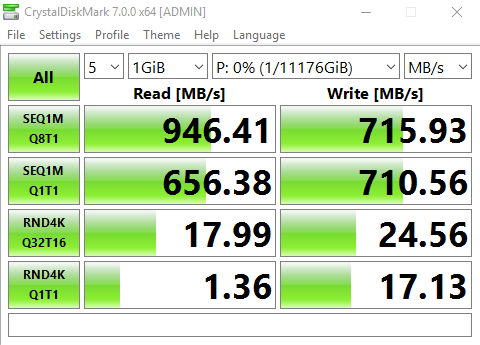
Performance of the Samsung 970 Evo Plus NVMe Drive was excellent in both machines. Merely the bulldoze operation is constrained in the R310 because information technology has a PCI Gen 2 x 4, whereas the T320 has PCI Gen 3.
Disabling C States in the BIOS increases operation in both machines.
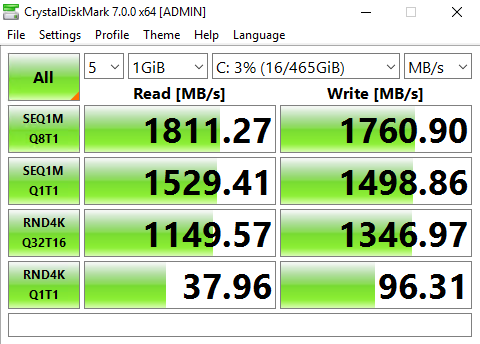
Hither are the results from a CrystalDiskMark from the R310 with C States Disabled:
Here are all the results from both machines with and without C States Enabled.
| Examination Type | C State | Motorcar | Read Result (MB/s) | Write Result (MB/s) |
| SEQ1M Q8T1 | Enabled | R310 | 1670.13 | 1636.13 |
| SEQ1M Q8T1 | Disabled | R310 | 1811.27 | 1760.xc |
| SEQ1M Q1T1 | Enabled | R310 | 1359.94 | 1346.70 |
| SEQ1M Q1T1 | Disabled | R310 | 1529.41 | 1498.86 |
| RND4K Q32T16 | Enabled | R310 | 1147.30 | 1351.01 |
| RND4K Q3T16 | Disabled | R310 | 1149.57 | 1346.97 |
| RND4K Q1T1 | Enabled | R310 | 35.95 | 85.65 |
| RND4K Q1T1 | Disabled | R310 | 37.96 | 93.31 |
| SEQ1M Q8T1 | Enabled | R320 | 3339.91 | 3124.31 |
| SEQ1M Q8T1 | Disabled | R320 | 3576.68 | 3265.89 |
| SEQ1M Q1T1 | Enabled | R320 | 2303.26 | 2510.44 |
| SEQ1M Q1T1 | Disabled | R320 | 2421.82 | 2793.11 |
| RND4K Q32T16 | Enabled | R320 | 1150.97 | 1557.42 |
| RND4K Q32T16 | Disabled | R320 | 1145.25 | 1558.19 |
| RND4K Q1T1 | Enabled | R320 | 33.23 | 101.27 |
| RND4K Q1T1 | Disabled | R320 | 43.98 | 111.05 |
As a rough comparing hither is the performance of a RAID 0 Array in the R310 comprising 4 x seven,200 RPM SATA Drives:
This R310 server also has a Samsung 860 EVO SSD in the DVD Drive bay, which is connected via a SATA 2 port on the motherboard:
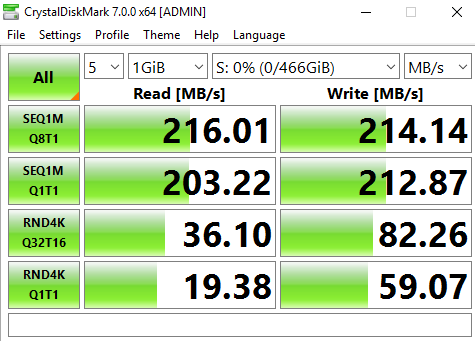
You can meet the performance of the drive being constrained by the SATA2 port, but it still gives proficient random performance.
If you are using VMWare then y'all can just admission the NVMe drive in the normal fashion if you are booting from a different storage device such as SD Card or USB Stick.
Conclusion – is it worth adding NVMe storage to a sometime Dell PowerEdge?
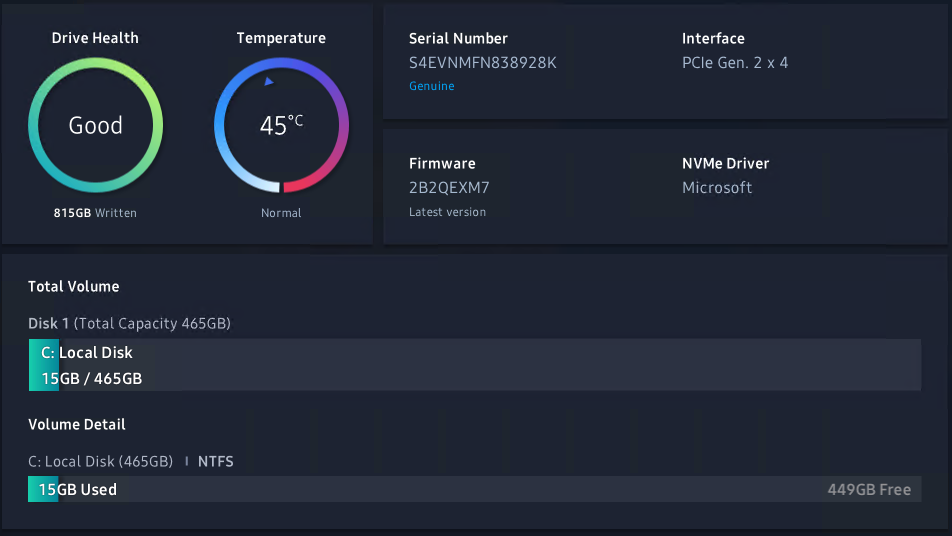
Given the low cost of both the adapter and Samsung SSD and the huge resulting operation boost, it is certainly worth experimenting.
I can't say if I would utilize this setup in production however, but then far, it seems to piece of work fine. Here is an image of Samsung Magician Drive data:
Source: https://www.tachytelic.net/2020/10/dell-poweredge-install-boot-pci-nvme/
Posted by: menendezupong1962.blogspot.com
0 Response to "How To Install Windows 7 On Dell Poweredge T20"
Post a Comment